How To Use Apache Reverse Proxy with mod_proxy on Ubuntu 16.04
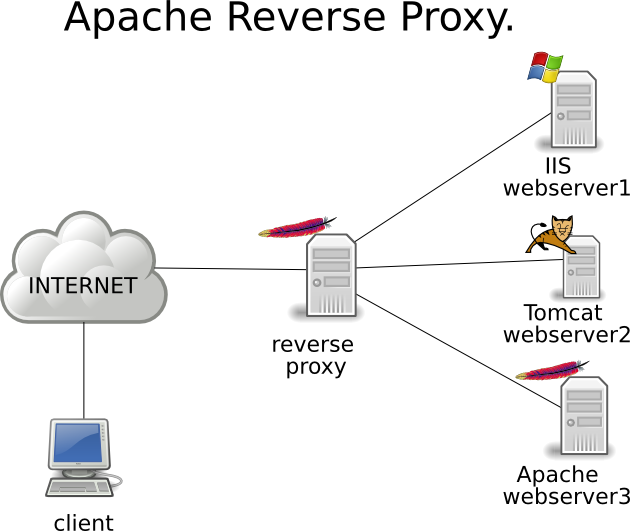
Reverse Proxy refer to a kind of proxy server, which takes HTTP requests and distributes them transparently to many backend servers. These reverse proxies are valuable because lots of contemporary web apps are processing incoming HTTP requests with backend apps servers. These are not intended to be accessed by users openly and often just support basic HTTP features.
A reverse proxy can be used to avoid underlying app servers from being openly accessed. They can be utilized to disseminate the load from the incoming requests to many diverse app servers. This improved performance at scale and provide fail-safeness. A reverse proxy can also bridge the gap with great features the app server does not provide, like compression, caching and SSL encryption.
This is the step on How to Use Apache Reverse Proxy with mod_proxy on Ubuntu 16
Step One: Allowing Essential Apache Modules
Apache has lots of modules packed with it, which are accessible but now allowed in a new installation. First, you will need to facilitate the ones utilize in this guide, which is the mod_proxy. Many of its affix modules, which expands its functionality in order to support diverse network protocols. Purposely, we will utilize:
mod-proxy: Main proxy module for redirecting connection, it enables Apache to serve as an entry point to the primary app servers.
mod-proxy balancer: add load balancing features for many backend servers
mod-proxy http: adds assistance for proxying HTTP connection.
These 4 modules can be enabled by means of following these commands in sequence.
- sudo a2enmod proxy
- sudo a2enmod proxy_http
- sudo a2enmod proxy_balancer
- sudo a2enmod lbmethod_byrequests
In order to put these modifications into effect, you have to restart Apache by following this command:
sudo systemctl restart apache2
Now apache is set to serve as a HTTP requests to apache reverse proxy. The next step, you will have to make to basic backend servers. This is essential for you to identify whether or not the configuration is working properly.
Step 2 — Making Backend Test Servers
Operating simple backend servers is a very simple method to try if the configuration of Apache module is functioning correctly.
Here, we will make 2 test servers the take action to HTTP requests. One server will state Hello world! while the other one will state Howdy world!.
We will be going to use Flask to make the test servers as an underlying application needs only some lines of codes.
First update the package list; sudo apt-get update
Afterwards install Pip, the suggested Python package manager: sudo apt-get -y install python3-pip
When installing Flask, use Pip: sudo pip3 install flask
All the needed components are now installed, next start through making a fresh file which will have the code for the initial backend server in home directory of the existing user. nano ~/backend1.py
Copy the code and then save:
~/backend1.py
from flask import Flask
app = Flask(__name__)
@app.route(‘/’)
def home():
return ‘Hello world!’
The 2nd backend server is precisely similar as the first, apart from going back to a diverse line of text, therefore begin through duplicating the primary line.
cp ~/backend1.py ~/backend2.py
Then open the recently copied file, modify the message and then save the file.
~/backend2.py
from flask import Flask
app = Flask(__name__)
@app.route(‘/’)
def home():
return ‘Howdy world!’
Utilize this command FLASK_APP=~/backend1.py flask run –port=8080 >/dev/null 2>&1 & to begin the initial background server. Also, this redirects Flask output to /dev/null as it will cloud the console result further on.
We are heading the flask command through setting FLASK_App background variable in similar line. These environment variables provide a simple way to transfer details into processes which are spawned. When using these variables, ensure the setting only applied to the command that’s being run and will not keep available later on.
The same way, use this command to begin the 2nd server. Keep in mind the diverse value for the Flask Application environment variable.
FLASK_APP=~/backend2.py flask run –port=8081 >/dev/null 2>&1 &
Step Three: Modify the Default Configuration to Allow Reverse Proxy
This step we are using the configuration at virtual host stage. On apache’s default installation, there’s only one, default virtual host allowed. But, you can utilize the entire configuration fragments in other hosts too.
In this section, we will set up the default Apache virtual host to serve as a reverse proxy for single backend server or an array of load balanced backend servers.
Open Apache configuration file with the use of nano or any preferred text editor. This should be like this:
sudo nano /etc/apache2/sites-available/000-default.conf
Here, you will see the <VirtualHost *:80> block beginning on the primary line. The sample below shows how to organize the block to reverse proxy for one backend server, and the other one is for many backend servers:
Single Backend Server on Apache Reverse Proxy
Restore the entire contents in Virtual Host so you can organize file. The configured file must be appear this way:
/etc/apache2/sites-available/000-default.conf
<VirtualHost *:80>
ProxyPreserveHost On
ProxyPass / http://127.0.0.1:8080/
ProxyPassReverse / http://127.0.0.1:8080/
</VirtualHost>
Once you choose to followed together with the sample servers mentioned in step two, utilize 127.0.0.1:8080
Here, there are 3 directives involve”
- ProxyPreserveHost which makes Apache module pass the novel host header. This is valuable, because it makes backend server to be aware of address utilized to access the app.
- ProxyPass the main proxy configuration directive
- ProxyPass Reverse must have similar arrangement as ProxyPass.
Restart the Apache to put the modifications into effect.
sudo systemctl restart apache2
Accessing http://your_server_ip in website browsers, you’ll witness your backend server reply instead of normal Apache welcome page. Once you followed the step 2, it means you will witness Hellow world!.
Load Balancing In Many Backend Servers
In case you have many backend servers, the best technique to hand out the traffic when proxying is through using mod-proxy load balancing features.
Replace the entire contents in Virtual Host with the subsequent, the arrange must be like this:
/etc/apache2/sites-available/000-default.conf
<VirtualHost *:80>
<Proxy balancer://mycluster>
BalancerMember http://127.0.0.1:8080
BalancerMember http://127.0.0.1:8081
</Proxy>
ProxyPreserveHost On
ProxyPass / balancer://mycluster/
ProxyPassReverse / balancer://mycluster/
</VirtualHost>
The arrangement is the same to the preceding one, but rather than specifying only one backend server openly. We have utilized an extra Proxy block in order to define multiple backend servers.
balancer://mycluster is the name of the block. The name can be changed and it has single or multiple balance members that specify the basic backed server address.
once you choose to follow the examples server in Step #2, utilize 127.0.0.1:8080 and 127.0.0.1:808. In case you have a personal app server, use its address instead.
Restart Apache to see changes: sudo systemctl restart apache2
Accessing http://your_server_ip on your apache reverse proxy, you will witness your backend servers’ replies rather than typical Apache page.
Conclusion
Now you already know how to install Apache module as your reverse proxy to single or multiple basic app servers. Keep in mind that mod_proxy could be utilized efficiently to arrange reverse proxy to app servers that are written in a huge range of technologies and languages.
While mod_proxy_http with mod_proxy is the most utilized combination of Apache modules, there are others which support diverse network protocols.
Thank you for reading our apache reverse proxy article. Have a wonderful day.